How to Install 4-Pin Trailer Wiring?
In this post we are going to explain how to install a 4-Pin wiring system. This is a special harness found mainly in light-duty trailers and it helps control all of the lights. Generally speaking, to use a trailer that does not have fully functioning lights you may risk trouble with the law.
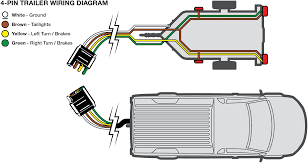
Introduction to the Color Code
The most important thing you need to know before you attempt to rewire a 4-Pin trailer is what the different color wires mean. These wires will correspond to a connection from the tow vehicle so you want to be sure the wires are connected correctly or you may give confusing driving signals to those behind your trailer.
There may be some variation in color codes depending on the manufacturer so always double check your instruction manual to make sure you have the right wires connected in the right places. Generally speaking however most 4-Pin wiring setups follow the below color coding.
- White: Ground Wire
- Brown: Tail/Running Lights
- Yellow: Left Side Turn and Brake Lights
- Green Right Side Turn and Brake Lights
It should also be noted that when it comes to this kind of wiring the minimum wire size is 18-gauge when connecting up a 4-way plug. This relates to the lighting wires while the ground wire can be a minimum of 16-gauge.
How to Install 4-Pin Trailer Wiring
As mentioned not all trailers and wiring kits are exactly the same so below we have a basic step by step guide to perform this task. You should always refer to your provided installation instructions and refer to an owner's manual for your trailer to ensure you are doing things correctly.
Gather the Supplies
This is true of any task you do in life, make sure you have all the supplies you need gathered to help streamline the process. This will include any tools, instruction documents and of course the parts you are using to wire the trailer.
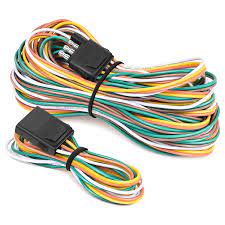
It is usually smart to get a trailer lighting kit as this will have all the parts you need to get the job done. You may not have to rewire everything so before you start make sure you know what is working and what is not. It may be a quicker task if you only need to fix a few elements of the system.
Connect the Ground Wire
The first job you will need to complete is connecting the ground wire. This will be connected to a bare clean portion of the trailer frame and will require a ring terminal and a self-tapping screw. The metal you connect the ground wire to should be clean and have no visible corrosion or paint.
This ground wire is important as it is going to serve as the grounding point for all of the trailer's lights. An ineffective ground wire will cause you issues so it is vital to get this part right.
Run the Wires
This is going to be the time consuming part of the install. You will have to run all of the other wires to their ultimate destinations. Based on the color code in your install instructions make sure the correct wires go to the right lights.
Ensure that the wires will not be rubbing up against components of the trailer as this can damage them over time and you will be replacing that wire again before too long. You may be able to run the wires along hollow sections of the trailer or you might want to install grommets to hold the wires in place. Another connection method is using zip ties but ultimately you want to avoid sagging or loose wiring.
Install Vehicle Wiring
If you are lucky your tow vehicle will already be set up for a 4-way connector and you simply need to plug in the wiring you have completed on the trailer. This will mean your job is done and you can be on your jolly towing way.
Find out before you start work if you need to fit a 4-way system to your car and what you will need to do this. It is a fairly easy job and any kit you buy will come with instructions. Be aware however that the model of vehicle will have an impact on how you fit this new system so make sure you know how to do the job for your specific car.
Connect the Trailer to the Vehicle
With the wiring correct on both the trailer and the vehicle you now want to connect the two systems together. Use a crimper to strip insulation from the wires and then using a heat gun and butt connector connect the wires securely.
At this point you may also choose to use a wishbone or Y harness so that you can split the running light into two wires. This allows one side to run the driver's side while the other controls the passenger side lights.
Your newly created wiring harness can now be plugged or clamped onto the lighting features of the tow vehicle. Ensure that you do not route the power wire from the harness to the car's battery as this will cause the trailer lights to be on all the time.
Ensure that the tow vehicle wiring has been grounded to a clean, uncorroded and paint free portion of metal. To avoid corrosion to this area later you can treat it with dielectric grease this will ensure you do not have grounding issues at a later time.
Test the Connection
The final task is to test that you have everything wired correctly and that it is all working. Have someone stand behind the trailer while you start the tow vehicle. Activate all the lights including running, brake and turn signals.
As long as they all illuminate when you take the appropriate action from the tow vehicle then you have done a good job and you are ready to go.
How Much Does Installing 4-Pin Trailer Wiring Cost?
The parts for this kind of project are not cheap and considering their importance this is hardly surprising. In parts alone you can be paying $150 - $300. Of course if you are doing the job yourself then this will be the extent of your spend.
If you need a professional to do this for you then you will be paying not only for parts but labor and taxes. This cost will vary but generally speaking professionals can get this done in less than 2 hours so it should not be too bad.
Conclusion
Rewiring a trailer may seem like a daunting task but when you are just doing a 4-Pin wiring system a moderate level of technical ability is enough to get it done. Ideally your toe vehicle will already be set up for this type of system but if not you may want to seek more professional assistance. It is one thing to rewire a trailer but messing with your car's electronics can be a bad idea.
Link To or Reference This Page
We spend a lot of time collecting, cleaning, merging, and formatting the data that is shown on the site to be as useful to you as possible.
If you found the data or information on this page useful in your research, please use the tool below to properly cite or reference Tow Ratings as the source. We appreciate your support!
-
<a href="http://towratings.net/blog/how-to-install-4-pin-trailer-wiring/">How to Install 4-Pin Trailer Wiring?</a>
-
"How to Install 4-Pin Trailer Wiring?". Tow Ratings. Accessed on April 19, 2024. http://towratings.net/blog/how-to-install-4-pin-trailer-wiring/.
-
"How to Install 4-Pin Trailer Wiring?". Tow Ratings, http://towratings.net/blog/how-to-install-4-pin-trailer-wiring/. Accessed 19 April, 2024
-
How to Install 4-Pin Trailer Wiring?. Tow Ratings. Retrieved from http://towratings.net/blog/how-to-install-4-pin-trailer-wiring/.