Installing a 4-pin trailer wiring harness
Step-by-step 4-pin trailer wiring install with wire color codes, ground connections, splicing tips, and cost breakdown for DIY and shop work.
A 4-pin (4-flat) trailer wiring install is a 60- to 90-minute job for someone comfortable with a crimper and a multimeter. Parts kit runs $20 to $40 (Hopkins 47025, Optronics, Curt 58040). Shop labor adds $80 to $200. Total at a shop: $100 to $250. DIY: $25 to $60 in materials.
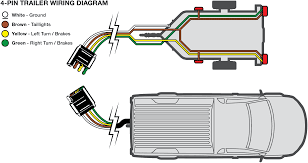
The wire colors are universal on 4-pin: white is ground, brown is tail/marker, yellow is left turn and brake, green is right turn and brake. Always confirm with a multimeter against the truck before you splice.
What you need
- 4-flat connector pigtail or kit (Hopkins 47025 for under $25 is a known good one)
- 16-gauge wire for lighting circuits, 12-gauge for ground
- Heat-shrink butt connectors (skip the cheap nylon-only crimp ones)
- Wire stripper / crimper combo
- Heat gun or lighter
- Self-tapping screws and a ring terminal for the ground
- Test light or multimeter
- 3/8” drill and bits for any new mounting holes
Wire color code
| Wire | Function | Gauge |
|---|---|---|
| White | Ground | 12 to 14 AWG |
| Brown | Tail and marker lights | 16 AWG |
| Yellow | Left turn and brake | 16 AWG |
| Green | Right turn and brake | 16 AWG |
This is the standard 4-flat. Both sides (tow vehicle and trailer) follow the same colors when made by reputable manufacturers. Some old trailers have non-standard colors; check with a multimeter before splicing.
Tow vehicle side: factory or splice-in?
Factory tow package vehicles (2014+ F-150, Silverado, Ram, Tundra, Tacoma, Frontier, Ridgeline, Cherokee, Wrangler, Pilot, 4Runner, Sequoia): have a 4-pin or 7-pin tow connector already mounted under the rear bumper. Plug and go. Look for a small dust-cap covered receiver near the hitch.
Vehicles with factory tow package wiring but no exposed connector: there’s a sealed plug in the harness near the hitch, usually under the bumper or behind the bumper cover. Tow-package kits include a pigtail that mates with this plug. 10-minute install with no splicing.
Vehicles with no factory tow package: you splice into the rear taillight wiring. A vehicle-specific T-connector kit ($30 to $80 from Hopkins or Curt) plugs in line with each taillight and gives you a 4-flat. No cutting required on most modern vehicles. Always check the part number for your year/make.
For older vehicles without T-connector options, you splice directly. Be patient and clean. Tape-only splices fail; use heat-shrink butt connectors.
Trailer side install
Step 1: Ground the trailer
The white wire is the foundation. Pick a clean, paint-free spot on the trailer frame near the front, drill a hole, sand the surrounding metal to bare steel, crimp a ring terminal on the white wire, and use a self-tapping screw with a lock washer to secure it. Add dielectric grease before bolting.
A bad ground is the #1 cause of trailer wiring problems. Don’t cheap out on this step.
Step 2: Run the wires
Route the wire harness from the front (where the 4-flat plug lives) down the trailer’s main frame rail to the back. Most trailers have a hollow frame or A-frame; you can fish the wires through.
Avoid sharp edges. Where the wire passes through a frame hole, use a grommet. Where it doesn’t, wrap with rubber tape. Cheap zip ties hold the harness against the frame so it doesn’t sag, but don’t replace proper grommets at chafe points.
Step 3: Splice or screw on the lights
Trailer light kits include simple two-bulb assemblies (one red, one amber/red combo). Mount with self-tapping screws. The white ground wire on each light bolts to the trailer frame at the light, not back at the main ground. Each light needs its own clean frame contact.
The brown wire from the harness goes to the brown wire on both lights (or splits with a wye connector). The yellow goes to the left light. The green goes to the right light.
Use heat-shrink butt connectors. Strip wire 1/2 inch, slide both ends into the connector, crimp, then heat-gun until the adhesive flows out the ends. Tape and butt connectors are NOT the same; the adhesive seal is what keeps water out.
Step 4: Test
Plug the harness into the tow vehicle. With the truck running:
- Headlights on. Both running lights should glow.
- Brake pedal. Both lights should light at full brightness.
- Left signal. Left light flashes.
- Right signal. Right light flashes.
- Hazards. Both flash.
If a light doesn’t work, the white wire ground at that light is the first suspect. Pull the bulb housing, sand the contact, regrease. About 80% of trailer light failures on new installs are a ground issue at the bulb.
Ford recall 26C10 affecting trailer connectors
Ford recall 26C10 (NHTSA 26V104000) issued March 2026 covers 4.3 million vehicles including F-150 (2021-2026), Ranger (2024-2026), Maverick (2022-2026), Expedition (2022-2026) and others for an Integrated Trailer Module software fault. The fault can cause trailer light signals to drop unexpectedly. The fix is an OTA software update pushed starting March 2026, free at any dealer. If you’re installing on a covered Ford and the lights are flaky after a fresh install, check the recall status before chasing wiring.
Common mistakes
- Splicing tap-only crimps without heat shrink. Salt water gets in within a season.
- Skipping the ground bolt sanding. The ring terminal won’t make good contact through paint.
- Running wires next to brake lines or fuel lines. Heat and chafe risk.
- Using too thin a wire. 18 AWG is too small for runs over 15 feet; use 16 AWG.
- Not testing before driving. Take 5 minutes to confirm every function.
Costs
| Scenario | Cost |
|---|---|
| Trailer-only rewire (DIY) | $25 to $60 in parts |
| Trailer-only rewire (shop) | $150 to $300 |
| Vehicle-side T-connector kit | $30 to $80 |
| Splice-in pigtail (DIY) | $15 to $30 |
| Splice-in install (shop) | $80 to $200 |
| Full both-sides install at a hitch shop | $150 to $400 |
When to upgrade to 7-pin
If your trailer has electric brakes (most travel trailers and many utility trailers over 3,500 lb), a 4-pin won’t cut it. You need a 7-pin (or 7-flat) to carry the brake controller signal, the auxiliary 12V, and the reverse signal. The wiring is the same idea, just more pins and wires. The 7-pin install runs $50 to $100 more in parts.
A 4-pin handles small utility trailers, single boat trailers, small pop-up campers, and most landscaping setups. It’s the standard light-duty option.